83 Jean St, Grange QLD 4051
Mon-Fri 07:30 AM - 04:00 PM - Sat - 8:00 - 12 - Sunday Closed
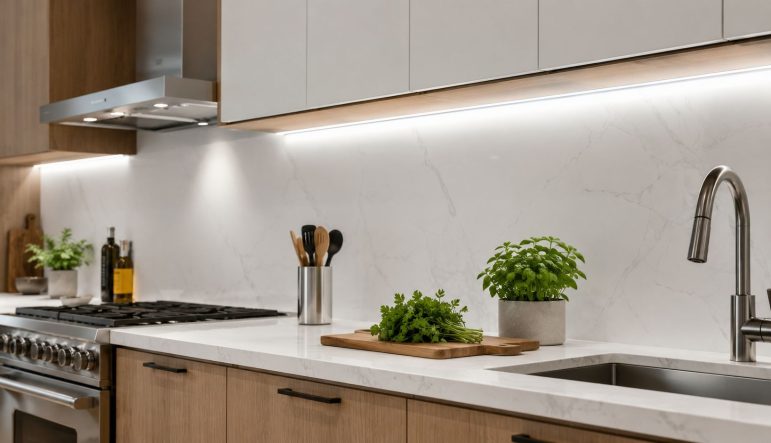
Late afternoon is when most kitchens expose their lighting problems. The ceiling light is on, but the bench still feels dim. Your body stands between the downlights and the chopping board. The splashback reflects a harsh patch of light while the area near the wall drops into shadow. Reading a recipe, checking whether chicken is cooked properly, or using a small appliance all becomes harder than it should be.
That's usually the point where homeowners start looking at kitchen under cabinet lighting. Not because it sounds fancy, but because it solves a very practical problem. It puts light where you work. Done well, it also makes the kitchen feel newer, cleaner, and more considered without changing the whole room.
The catch is that most advice online leans heavily toward quick DIY products. That's fine for a temporary fix. It's not the full story for a Brisbane home where you want a neat finish, safe wiring, and a setup that works every day without visible cords, dead batteries, or control issues.
A kitchen can be beautifully renovated and still feel inconvenient if the bench lighting is wrong. I've seen plenty of kitchens with good cabinetry, quality stone, and decent overhead lighting that still leave the prep area poorly lit. The common complaint is simple: “Why is it still so dark where I'm working?”
Under-cabinet lighting fixes that by aiming light directly onto the benchtop instead of flooding the whole room from above. That matters most at the sink, the cooktop, and the main prep zone. Those are the places where shadows get in the way and where poor visibility becomes a safety issue, not just an annoyance.
There's also a design benefit people notice straight away. Once the underside of the overhead cabinets is lit properly, the splashback reads better, the bench looks more inviting, and the whole kitchen feels more finished. If you're also thinking about display lighting and layered kitchen lighting more broadly, this guide on how to elevate your kitchen design with lighting is useful for seeing how different cabinet lighting ideas work together.
Practical rule: Good under-cabinet lighting shouldn't draw attention to the fitting first. It should make the bench easier to use first, then improve the look of the kitchen as a result.
The best results come from treating it as part of the electrical design, not as an afterthought. Fixture type, mounting position, beam spread, driver location, switching, dimming, and compliance all affect the final result. If even one of those decisions is off, the kitchen can end up with glare in your eyes, dark strips along the wall, or a cluttered installation that looks temporary.
The three main options are LED strips, puck lights, and bar lights. All three can work. They just solve different problems, and some are better suited to permanent hardwired installations than others.
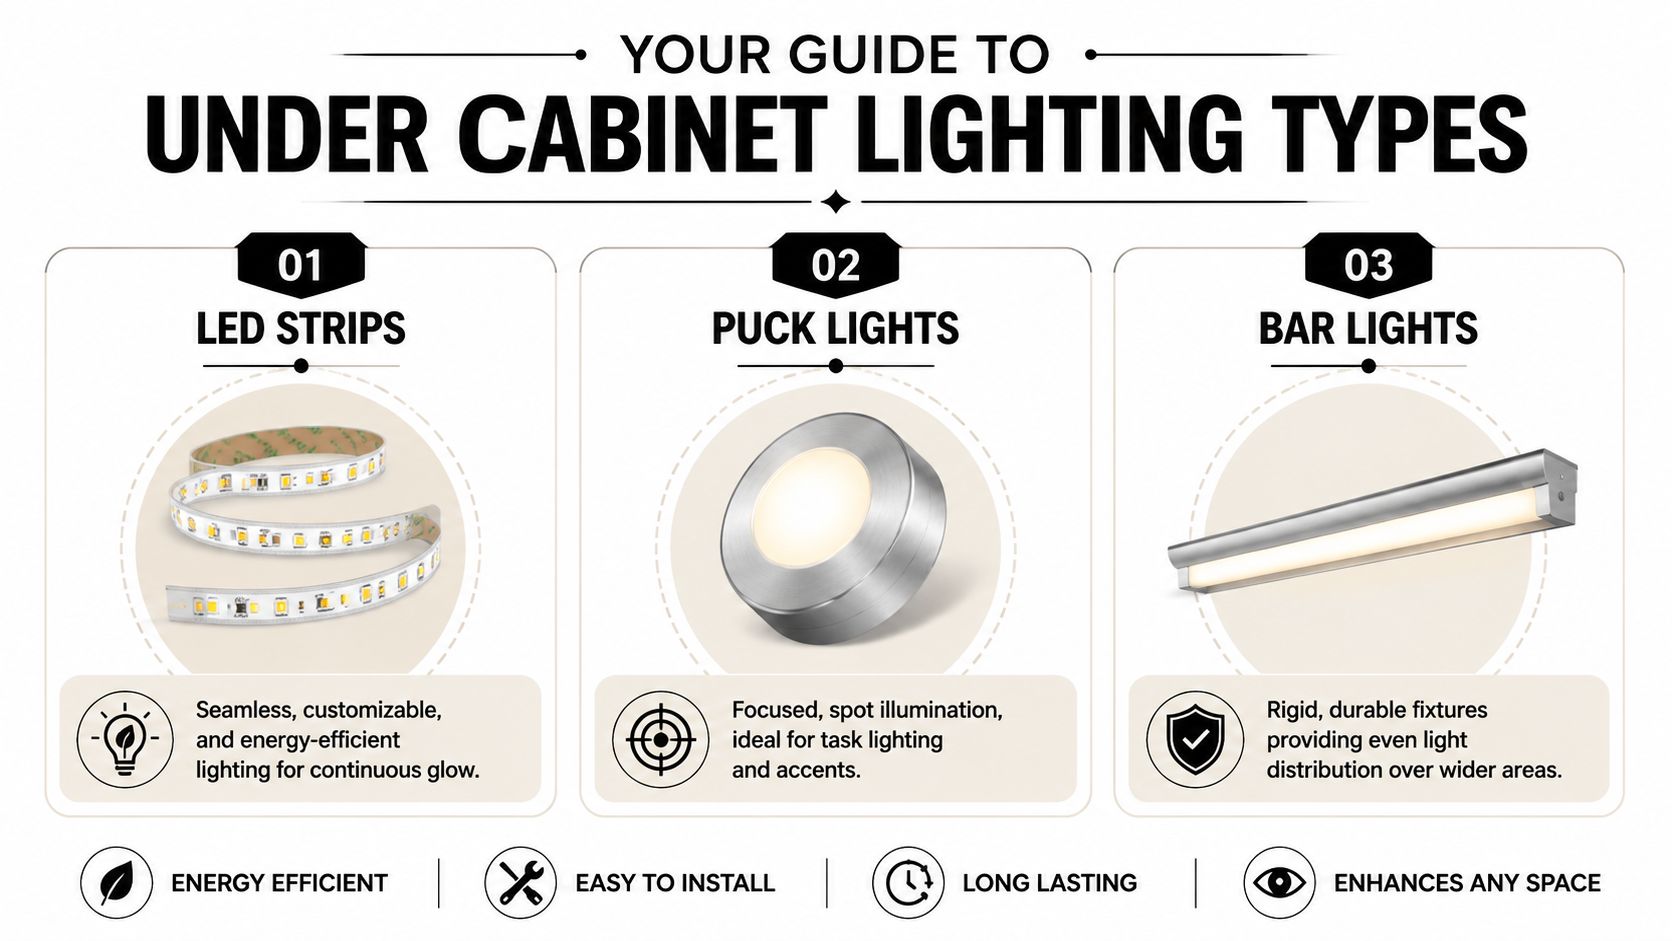
LED strip lighting is the most flexible option. It can run nearly the full length of the cabinet, which gives a continuous line of light instead of separated pools. In a modern Brisbane kitchen, that usually creates the cleanest look.
Strips are especially useful where cabinet lengths vary or where you want the fitting hidden inside an aluminium profile. The profile matters. It protects the strip, helps with heat management, and diffuses the light so individual diode dots are less visible.
For actual bench work, brightness matters more than many homeowners expect. For under-cabinet lighting in Brisbane kitchens to work as effective task lighting, fixtures need 200 to 500 lumens per linear foot. Lower output such as 100 to 150 lumens per linear foot only suits subtle accent lighting and doesn't provide the cool white (6000K) visibility needed for safer food preparation and appliance use, as noted in this guide to choosing under-cabinet lighting.
A strip can look excellent. A weak strip just gives you decorative glow.
Later in the process, homeowners often compare this with other bench lighting options. If that's part of your renovation planning, this article on modern kitchen bench lighting ideas is a good companion read.
Puck lights are small round fittings that create distinct circles of light. They're better when you want emphasis on selected areas rather than a continuous wash across the whole bench.
That can suit a small coffee station, a display section, or a feature cabinet run. It's less ideal for a long prep bench where consistent illumination matters. If puck lights are spaced poorly, you'll notice bright spots directly under the fittings and dimmer gaps between them.
Bar lights sit between strips and pucks. They're rigid linear fittings, usually easier to mount neatly than a bare strip and often more durable in utility-style spaces. They work well where the cabinet run is straightforward and where you want an even output from a self-contained fitting.
The trade-off is flexibility. Fixed bar lengths don't adapt as neatly to every cabinet run, and they can be more visually prominent if the underside of the cabinetry is exposed from nearby living areas.
Here's the quick comparison most homeowners need:
| Lighting Type | Best For | Light Quality | Installation Complexity |
|---|---|---|---|
| LED strips | Long continuous bench runs, modern kitchens, hidden installations | Seamless and even when paired with profile and diffuser | Moderate to high for a clean hardwired result |
| Puck lights | Accent zones, small work areas, display emphasis | Focused pools of light with visible spacing | Moderate |
| Bar lights | Straight cabinet runs, utility-focused kitchens, robust fittings | Even light across each fitting length | Moderate |
A short video can also help if you want to see the fixture styles side by side before deciding:
Choosing the fitting is only half the job. Layout decides whether the light lands where you need it or becomes something you notice for the wrong reasons.
This is one of the most overlooked decisions in kitchen under cabinet lighting. Many DIY guides treat the underside of the cabinet like any position will do. It won't.
In practice, mounting too far back often throws more shadow onto the front part of the benchtop because the cabinet itself blocks part of the beam. Mounting too far forward can create direct glare when you're standing at the bench or looking across the kitchen from an open-plan living area.
For standard 600mm countertops, mounting LED strips 3 to 3.5 inches behind the cabinet face can reduce glare by up to 40% while still maintaining even illumination, according to this discussion in r/AusRenovation on under-cabinet lighting placement. That's a useful benchmark for Brisbane kitchens, especially where matte cabinetry absorbs light and exposes uneven coverage more quickly.
Mounting position changes everything. The same LED strip can look sharp and balanced in one kitchen, then harsh and patchy in another, simply because it was fixed in the wrong spot.
Not every under-cabinet installation has the same job. Some kitchens need proper task lighting over every active work zone. Others need a softer layer that supports the room at night.
A practical way to think about it is this:
Cabinet finish, splashback tile, stone colour, and room orientation all affect how the light reads. Warm finishes soften the result. White stone and glossy tiles bounce more light back into the room. Dark stone and matte doors absorb more of it.
That's why layout should be considered alongside finishes. If you're selecting a splashback or wall finish at the same time, a Guide to upcoming tile innovations can help you think about how surface texture and reflectivity will interact with cabinet lighting.
For broader layered planning, this overview of modern kitchen lighting design is also worth reading.
Power supply changes the whole standard of the installation. Homeowners often start by comparing features on the light itself, but the better question is how the system will be powered day after day.
Battery-operated fittings are the quickest to install and the easiest to buy. They suit short-term use, rentals, or situations where you can't alter the cabinetry or electrical setup.
They also come with obvious drawbacks. Batteries need replacing or charging, output often fades over time, and many units rely on motion sensors that don't always trigger when you want them to. In a main kitchen, that gets old quickly.
Plug-in under-cabinet lights can give a stronger result than battery products, but they usually create a visual compromise. The cord has to go somewhere. Sometimes it drops to a powerpoint on the splashback. Sometimes it runs through a cupboard. Sometimes it ends up visible from the side.
That may be acceptable in a laundry, a utility room, or a temporary renovation stage. It usually isn't what people want in a finished kitchen.
A professionally hardwired system is the cleanest long-term solution. The wiring is concealed, switching is integrated properly, and the lights become part of the kitchen rather than an accessory attached to it.
That matters for three reasons:
A kitchen renovation is one of the last places where a temporary-looking electrical finish makes sense. The cabinetry is custom. The stone is fixed. The lighting should belong there too.
For homeowners renovating once and wanting it done properly, hardwiring is usually the right answer. Battery and plug-in products still have a place. They just don't match the standard desired for a permanent kitchen upgrade.
Once the system is hardwired, the next questions are usually about dimming, smart control, and what sits behind the scenes to make LED lighting work safely.
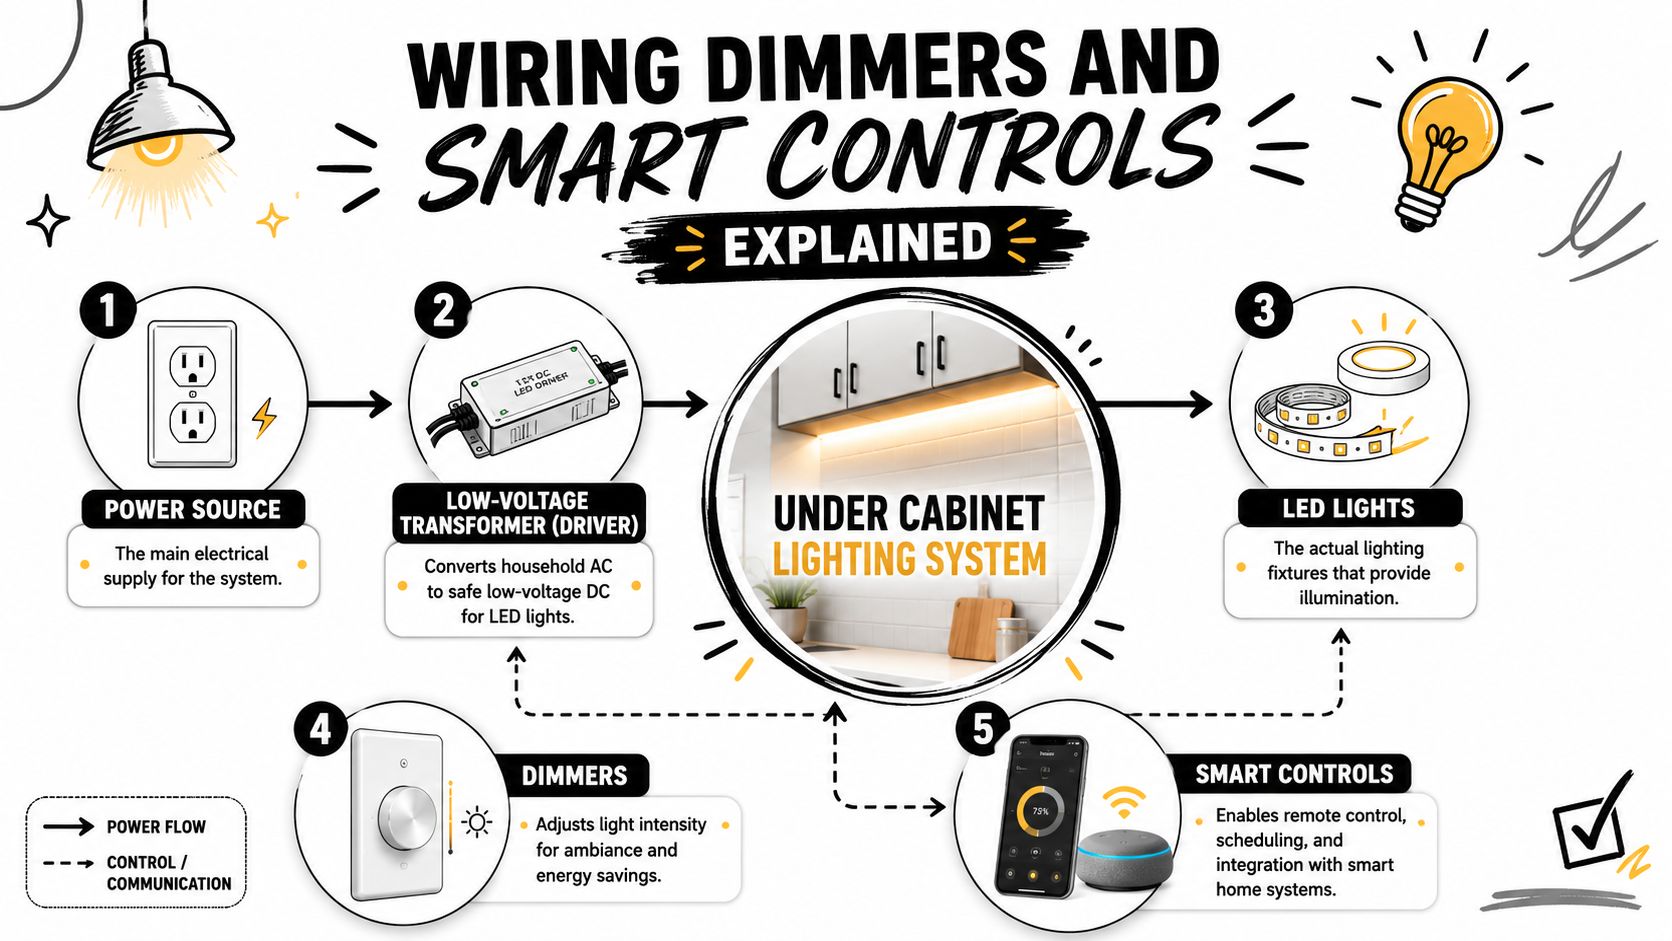
Most under-cabinet LED systems don't run directly off standard household supply at the fitting. They use a driver or transformer to convert power for the LED load. In practical terms, that means the electrician has to choose the right type, place it somewhere accessible, and allow for ventilation and future servicing.
In kitchens, driver placement needs thought. You want it hidden, but not buried in a way that turns future maintenance into cabinet demolition. Base cabinets, service voids, and other accessible concealed spaces are usually better than inaccessible cavities.
Dimming sounds simple until incompatible parts start flickering, buzzing, or dropping out at low levels. The dimmer, the driver, and the LED fitting all need to work together.
A good setup lets you use bright task lighting when cooking, then reduce the level for evening ambience. That's especially useful in open-plan homes where the kitchen remains visible after dinner and you don't want every surface fully lit.
If you want a clearer picture of what electricians check before fitting controls, this guide on how to install a dimmer switch covers the basics from the control side.
Smart lighting is popular because it adds convenience. Timed scenes, app control, voice integration, and programmable settings all make sense in a kitchen that does double duty as a work zone and a social space. According to this video reference on smart lighting preferences and installation considerations, 70% of AU homeowners prefer smart lighting with programmable settings, yet many guides don't explain how to safely integrate 12V/24V LED systems with standard 240V mains in a compliant way.
That's where older Brisbane homes need extra care. A house with an ageing switchboard, limited spare space, or legacy wiring may need more than just a new fitting and a smart switch. Cable routes, circuit capacity, and equipment compatibility all need checking before anything is installed.
Electrical work in a kitchen isn't just about getting the lights on. It has to comply with AS/NZS 3000 and be carried out by someone licensed to do the work. That includes the hardwiring, the integration with mains supply, and the placement of associated components.
Non-compliant work can create faults that aren't obvious at handover. A light might operate, but that doesn't mean the installation is safe, serviceable, or legal.
DIY under-cabinet lighting often looks cheap at the checkout and expensive later. The issue isn't just whether a homeowner can physically stick a fitting under a cabinet. It's whether the final result is safe, neat, compliant, and worth keeping for years.
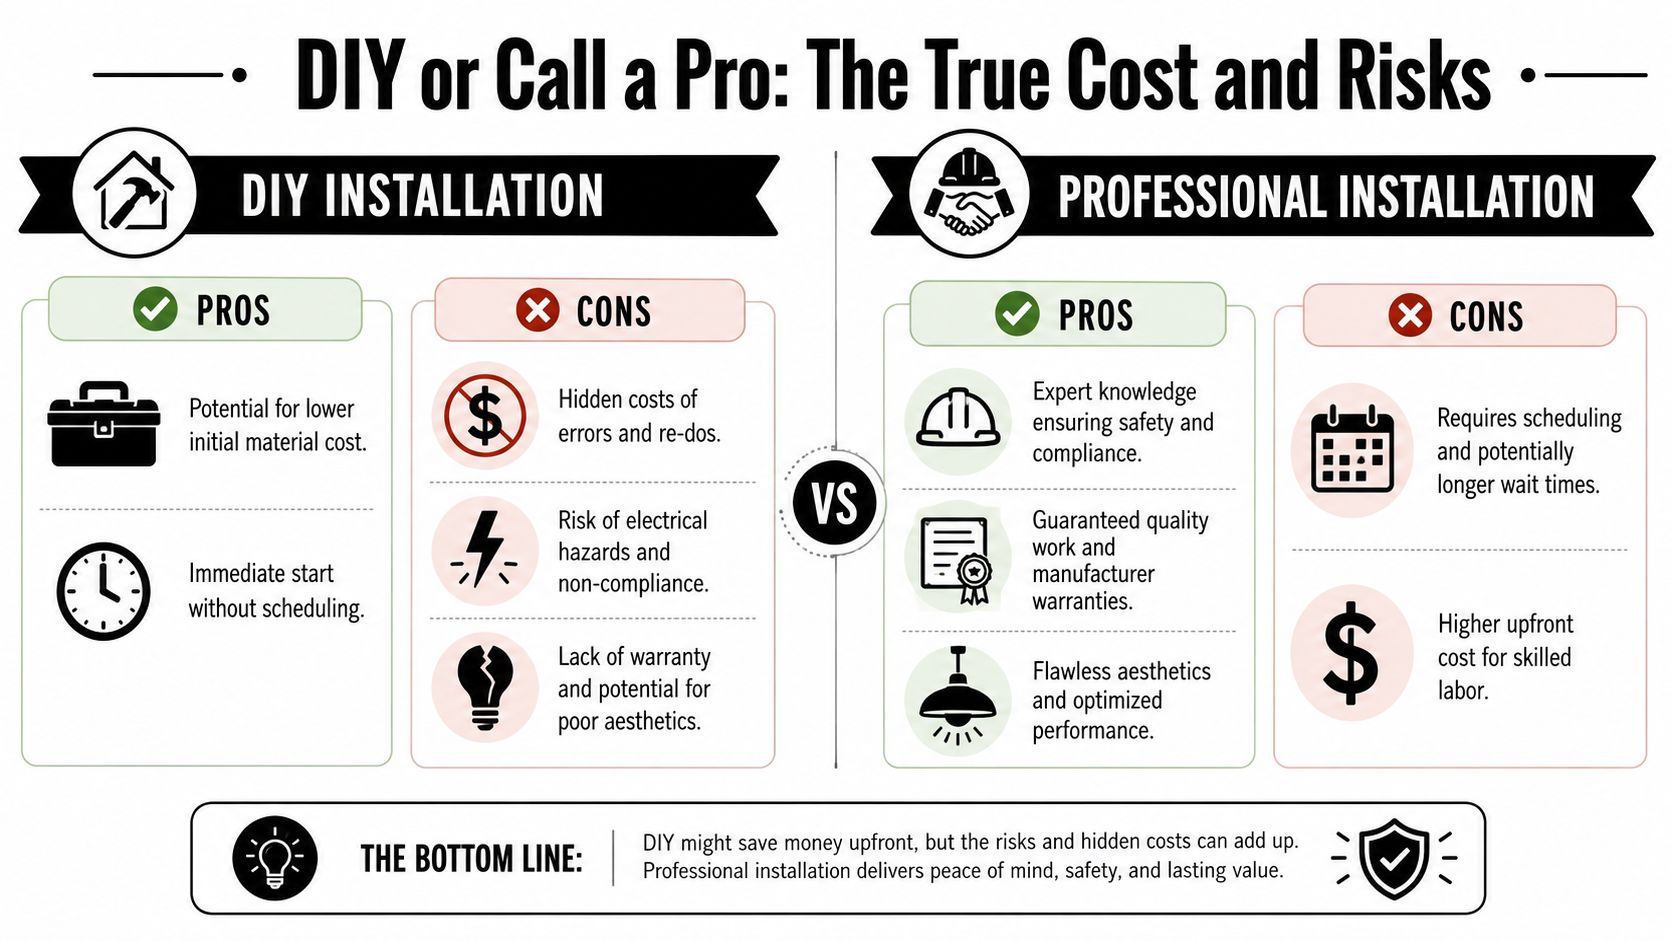
There are situations where DIY makes sense. A battery strip inside a pantry. A temporary plug-in light while waiting for a renovation. A renter adding removable lighting with no wiring changes.
DIY also appeals because you can start immediately. No booking. No trades coordination. No opening walls or cabinets.
The problems tend to show up in four places:
A lot of homeowners start with inspiration images and then realise the polished result depends on more than the fitting itself. Looking through examples of lighting solutions from The Cabinet Coach can help clarify the difference between a product idea and a resolved installation.
If the job needs a new switched feed, a transformer, concealed cabling, or integration with existing circuits, it's electrician work. That isn't a style preference. It's a safety requirement.
You should call a licensed electrician if any of the following apply:
Professional installation usually costs more upfront than buying a DIY kit. But the comparison shouldn't stop at the purchase price. Homeowners also need to think about rework, damaged cabinetry, poor aesthetics, unreliable controls, and the risk of non-compliant electrical work. In a finished kitchen, the cheapest first step often isn't the cheapest outcome.
For kitchen under cabinet lighting, the primary goal isn't just brighter benches. It's a result that looks integrated, works properly every day, and meets the standard expected in a permanent kitchen upgrade.
That takes more than choosing a strip, puck, or bar fitting. It takes proper planning of mounting position, switching, driver location, cable paths, and compliance. In Brisbane homes, especially older ones, those details matter because the existing electrical infrastructure may not suit a simple add-on approach.

DLG Electrical is a family-owned Brisbane electrical contractor with over 19 years of local experience, fully licensed and insured electricians, and a five-star Google rating. The team handles residential lighting, switchboards, upgrades, maintenance, and custom electrical work with a strong focus on safety, reliability, and getting the job done right the first time.
For homeowners, renovators, landlords, and property managers, that means one point of contact for a lighting installation that isn't just attractive, but properly designed and professionally executed. The difference shows in the finish. No visible shortcuts. No guesswork around controls. No uncertainty about whether the work meets the right standard.
If you're planning DLG Electrical for your kitchen under cabinet lighting project, get in touch for a free, no-obligation quote. Whether you're renovating, updating an older Brisbane kitchen, or want a clean hardwired lighting solution with dimmers or smart controls, the team can help you plan it properly from the start.

Master Electrician with over 30 years of experience. Founded DLG Electrical in 2005 after international project work including electrical installations at Stamford Bridge Stadium, London(Home of Chelsea FC).

Local Electricians that can fix all Electric Hot water Systems.
Motion sensor lights are a versatile addition to any home, offering nu
