83 Jean St, Grange QLD 4051
Mon-Fri 07:30 AM - 04:00 PM - Sat - 8:00 - 12 - Sunday Closed

Before you even think about touching that ceiling fan, let’s talk about the single most important rule: safety. Working with electricity isn’t the time for guesswork. The first and only step you should take is to completely cut the power at the source.
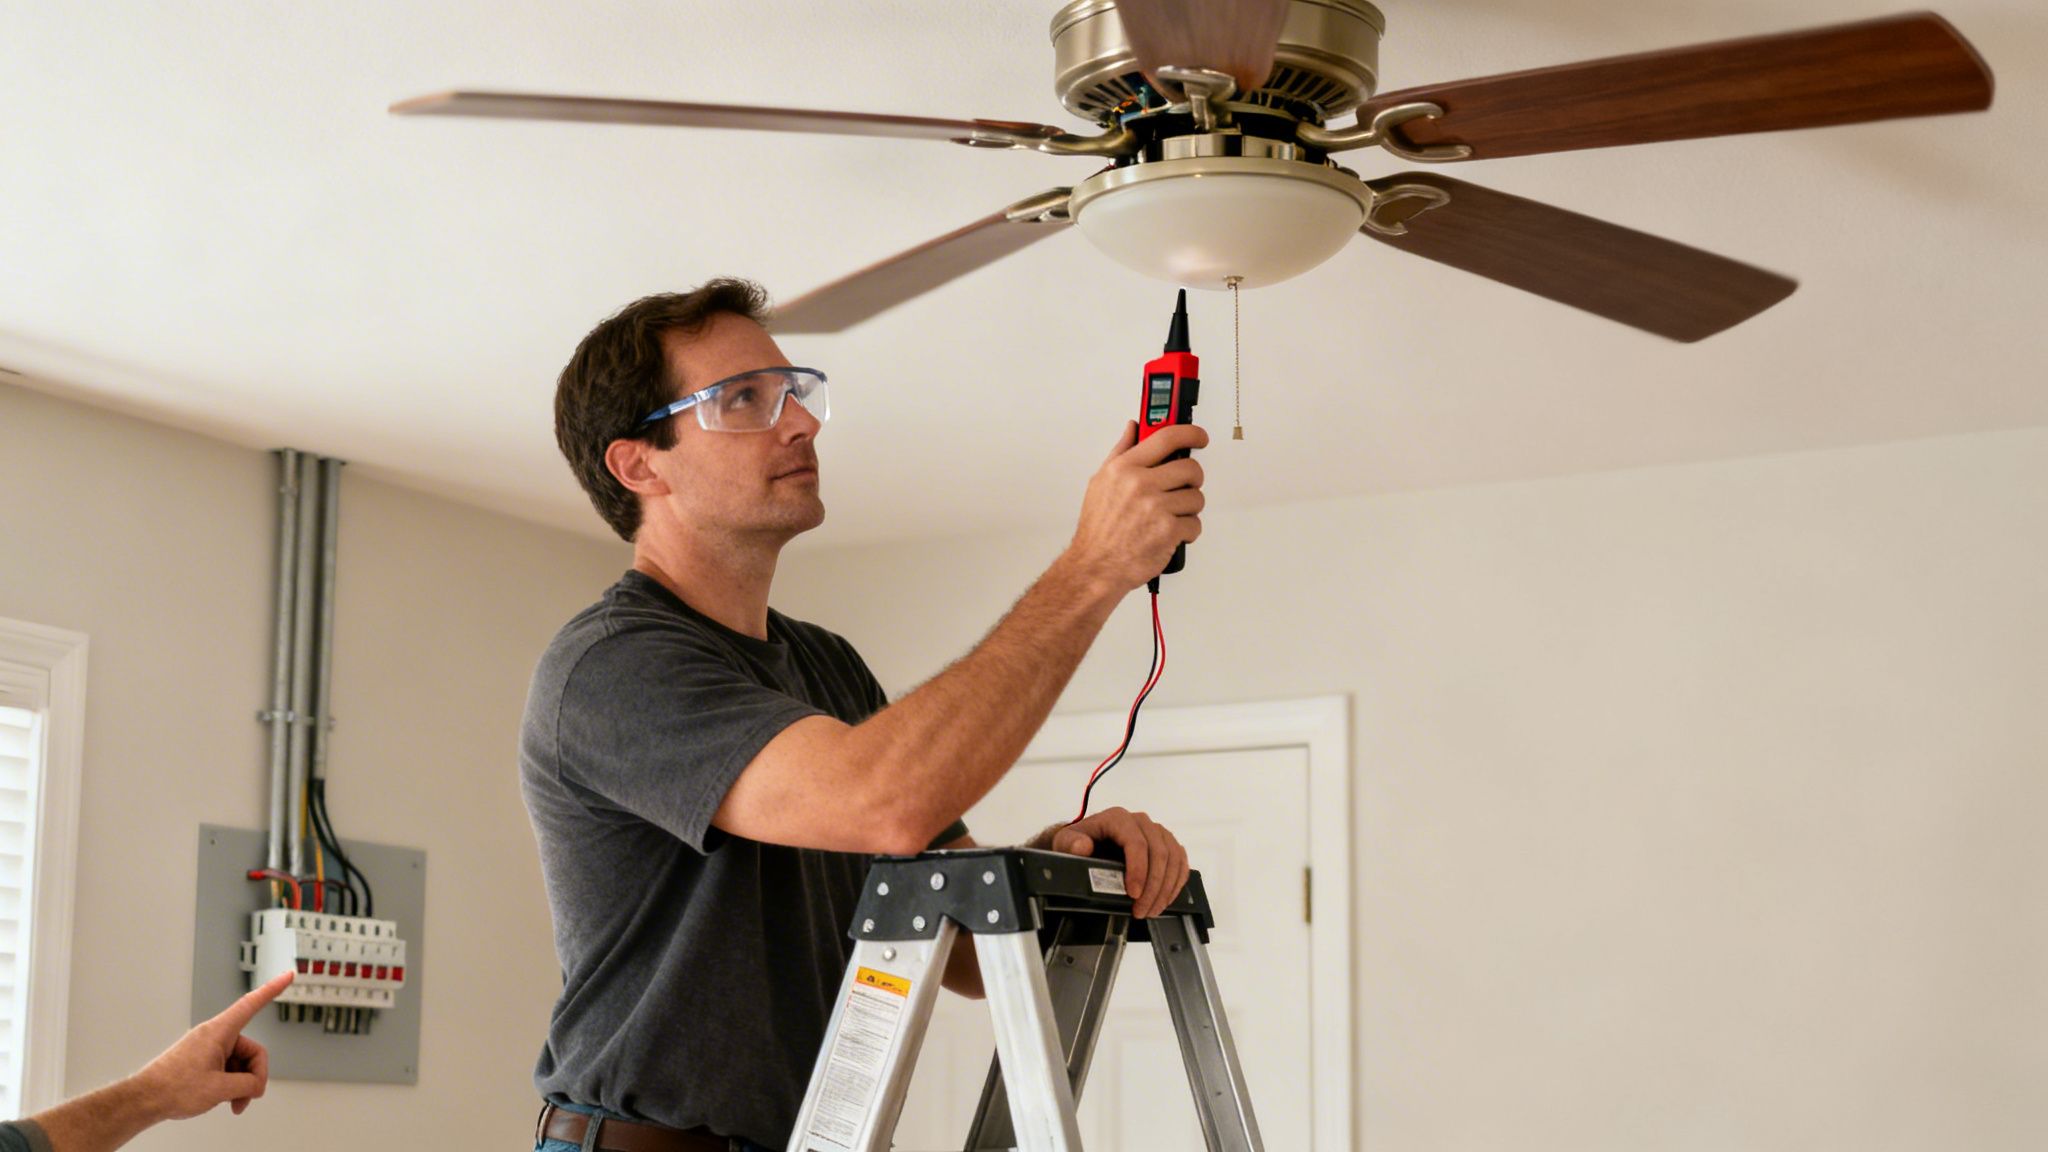
Before a single tool comes out of the box, a proper safety and diagnostic check is the most critical part of any ceiling fan repair. We see it all the time—homeowners getting a nasty surprise because they skipped this step. The goal isn’t just to flick a switch; it’s about confirming the power is well and truly off before you figure out what’s actually gone wrong.
This initial investigation saves you a huge amount of time. More importantly, it helps you know if you’re looking at a five-minute DIY fix or a more complex problem that really needs a licensed electrician. After years on the tools, I can tell you that most fan issues fall into just a few common buckets you can spot with a quick inspection.
First things first, head straight to your home’s switchboard. Find the circuit breaker for the room with the faulty fan. If your board isn’t labelled clearly (which is pretty common, especially in older homes), you might have to do a bit of trial and error. Just turn the fan on, then start flipping breakers one by one until it stops.
Once you’ve flipped the breaker to the ‘off’ position, walk back to the fan. Now, try to turn it on with both the wall switch and any pull chains it might have. This simple double-check confirms you’ve killed the right circuit. But you’re not done just yet.
Crucial Safety Step: Always, and I mean always, use a non-contact voltage tester to be 100% certain there’s no power. Hold the tip of the tester near the wires inside the switch or at the fan’s canopy. If it beeps or lights up, there’s still live power. Do not go any further until you find and turn off the correct breaker.
If you’re looking at an older switchboard and aren’t sure what you’re dealing with, it helps to understand the difference between a fuse and a circuit breaker, as the systems can vary.
With the power confirmed off, it’s time to play detective. Running through this checklist will help you narrow down the cause before you even think about taking anything apart.
Here in Brisbane suburbs like Grange or Windsor, we see a lot of older character homes. The high humidity can really take its toll, causing electrical contacts to corrode and motor bearings to wear out faster. This initial check gives you a clear picture of what you’re up against, so you can decide whether to tackle a simple fix yourself or call in a professional for a safe, guaranteed solution.
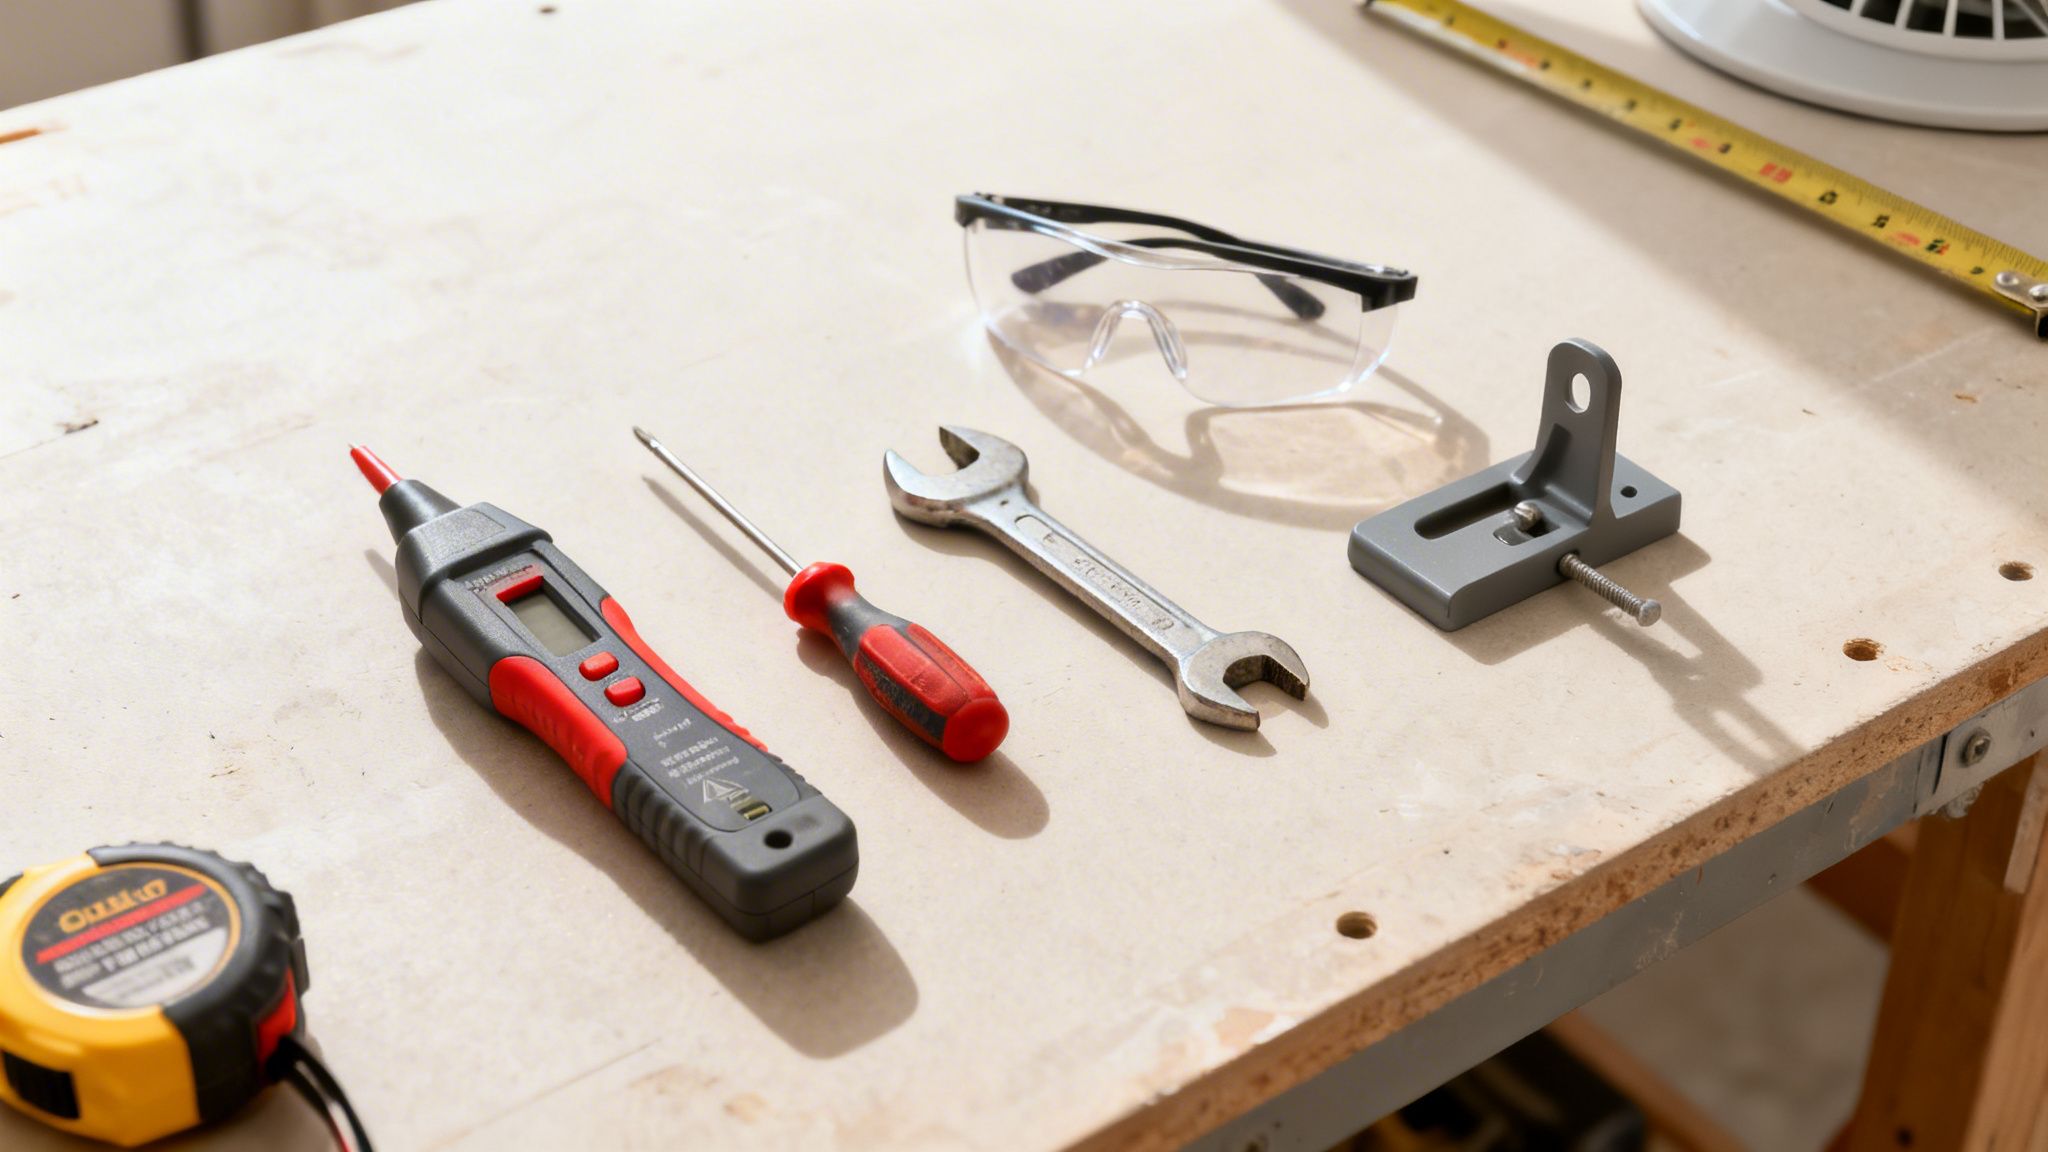
There’s nothing more frustrating than getting halfway through a job, balanced on a ladder, only to realise the one tool you need is still in the garage. I’ve seen it countless times. Taking a few minutes to gather the right gear before you start is the difference between a quick 30-minute fix and a frustrating half-day ordeal.
It’s not about owning a workshop full of expensive equipment. It’s about having a small, specific set of tools ready to go. Let’s walk through exactly what you’ll need and why.
Before you climb that ladder, do a quick inventory. Having these items within arm’s reach will make the entire process smoother and, more importantly, safer.
| Tool/Item | Primary Use | My Pro Safety Tip |
|---|---|---|
| Non-Contact Voltage Tester | To confirm 100% that the power is off before you touch any wires. | Always test your tester on a known live circuit (like a power point) first to ensure it’s working before you test the fan wiring. |
| Sturdy Stepladder | Safely accessing the ceiling fan without over-reaching or losing your balance. | Forget the wobbly dining chair. Make sure your ladder is on stable, level ground and tall enough so you’re not standing on the top rung. |
| Safety Glasses | Protecting your eyes from falling dust, debris, or a dropped screw. | This is a non-negotiable. An unexpected bit of grit in your eye when you’re working overhead is a recipe for disaster. |
| Screwdrivers | Tightening or removing screws on the fan canopy, light kit, and blade brackets. | A multi-bit screwdriver is great, but make sure you have both Phillips-head and flat-head bits. Older fans can have a mix of screw types. |
| Adjustable Wrench or Socket Set | Tightening loose nuts on the mounting bracket or downrod hanger ball. | A wobbly fan is often just a loose nut. An adjustable wrench saves you from guessing the right size. |
| Wire Strippers/Cutters | Cutting and stripping wires if you need to replace a faulty switch or remote receiver. | Use the correct gauge slot on your strippers to avoid nicking the copper wire, which can create a weak point and a potential fire hazard. |
| Fan Balancing Kit | Fixing a persistent wobble that tightening screws can’t solve. | These often come with new fans but are sold separately. The little weights might seem flimsy, but they make a huge difference. |
With this handful of tools, you’re well-equipped to tackle the most common ceiling fan problems safely and efficiently.
Before you even touch a screwdriver, safety is your top priority. That starts with a stable stepladder. You need a secure platform that lets you work with both hands without teetering.
Next, put on your safety glasses. Ceiling fan housings collect years of dust, and the last thing you want is that falling into your eyes while you’re focused on a wire.
Most importantly, you need a non-contact voltage tester. This little pen-sized tool is your lifeline. It lets you verify with absolute certainty that no power is flowing to the fan after you’ve switched off the circuit breaker. It’s a cheap tool that provides priceless peace of mind.
Most fan problems, especially wobbles and strange noises, come down to something being loose. A good set of screwdrivers is essential. While many fans use Phillips-head screws, you can run into flat-heads on older light kits, so having both is wise.
I’ve seen plenty of stripped screws from people using the wrong size bit. If a screw feels stuck, apply firm, direct pressure into the head as you turn slowly. This helps the bit grip properly and prevents you from rounding it off.
For the nuts securing the mounting bracket to the ceiling box, you’ll likely need an adjustable wrench or a small socket set. These are almost always the culprits behind a shaky fan.
And if your diagnosis leads you to a faulty wall switch or a burnt-out remote receiver, a pair of wire strippers is a must. They ensure you can make clean, secure connections without damaging the wires. Getting these basics together from the start sets you up for a successful, stress-free repair.
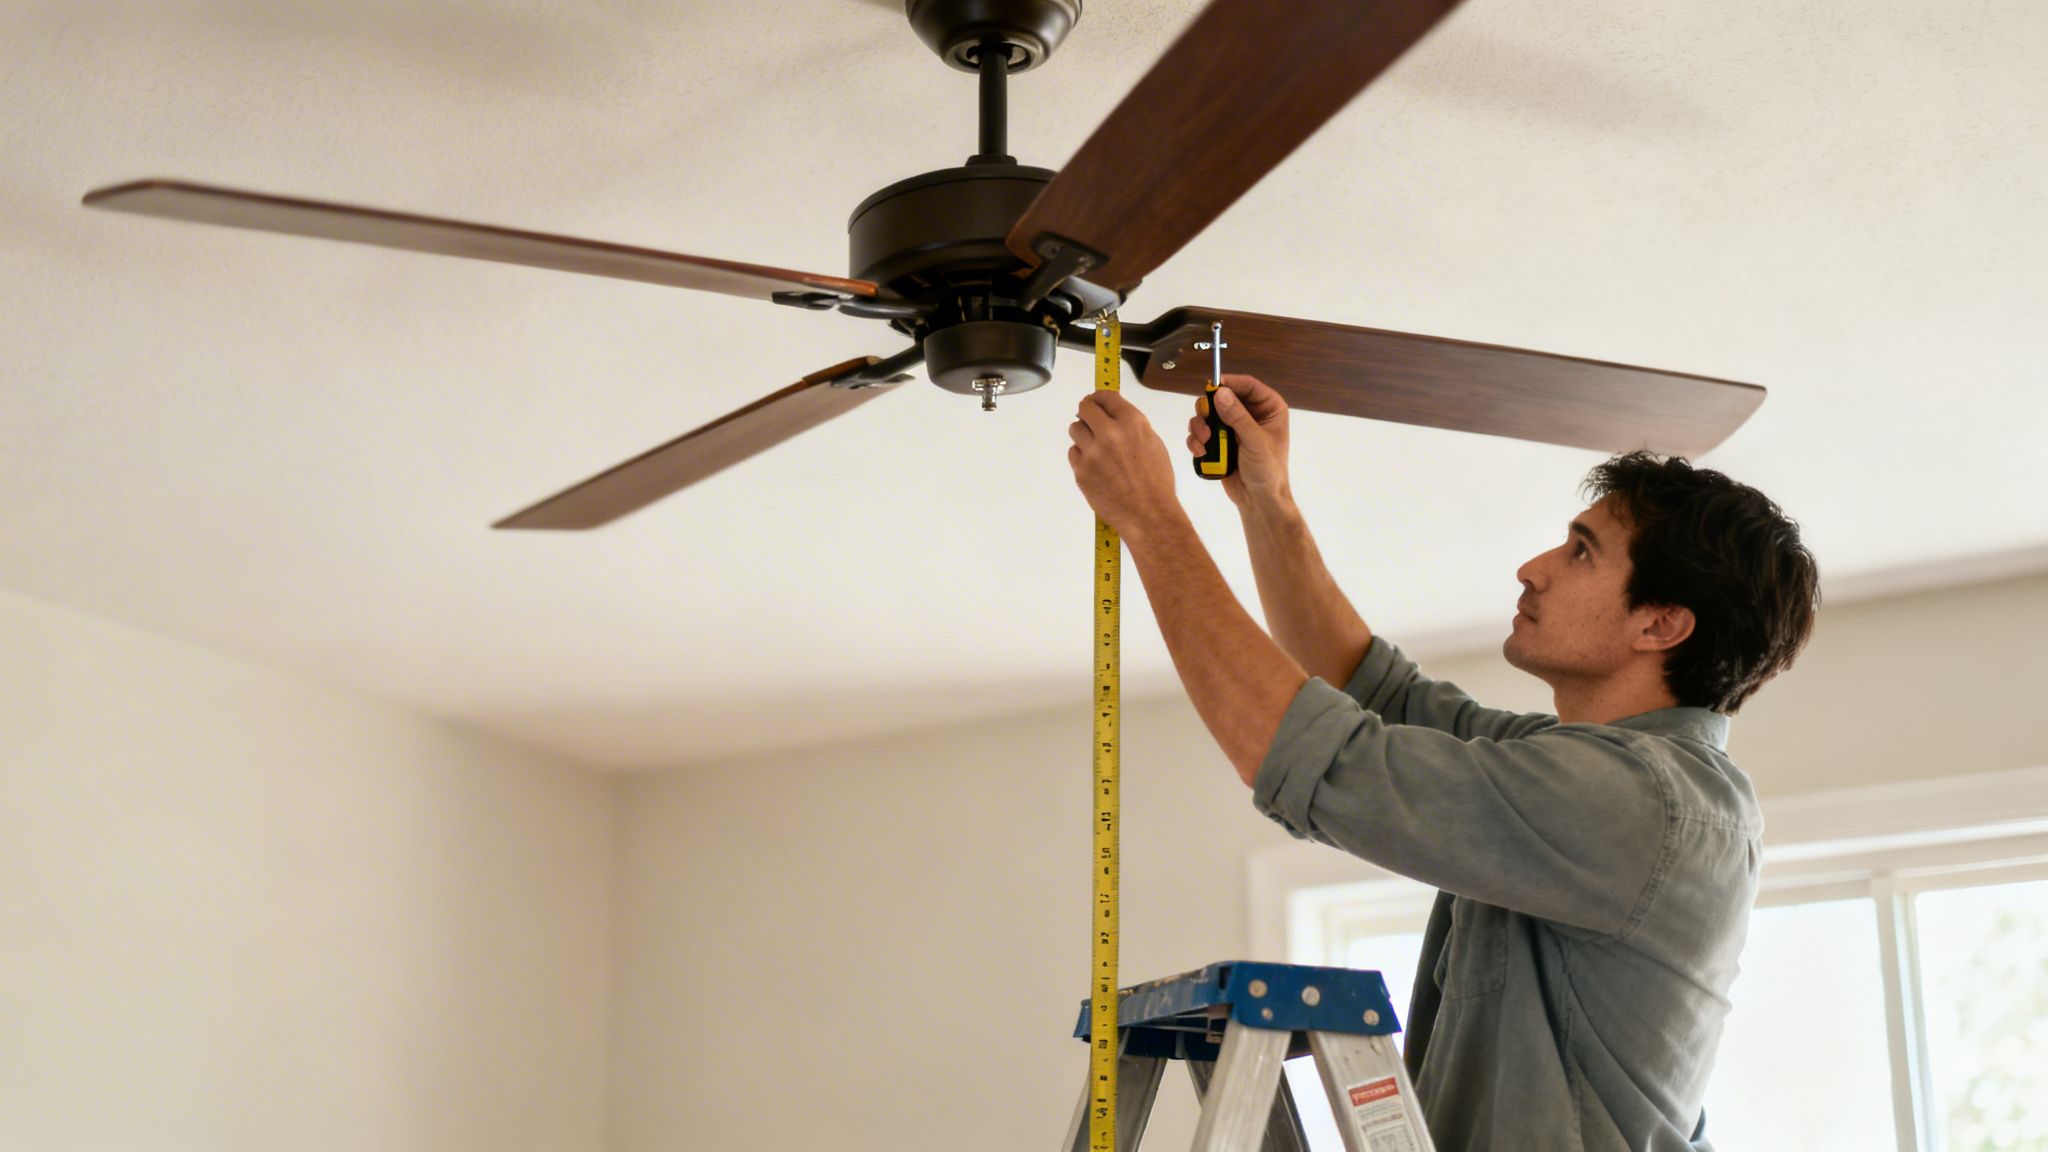
There’s nothing more distracting than a ceiling fan that wobbles and clicks with every rotation. It’s not just annoying; it’s a red flag that something’s off balance. Over time, that constant shaking puts extra stress on the fan’s motor and mounting, which can become a genuine safety risk.
Fortunately, most wobbly fans can be fixed with a bit of patience and a methodical approach. We’ll walk you through the exact process our team has used for years to get fans in North Brisbane homes running smoothly and silently again, starting with the simplest culprits first.
Believe it or not, the most common cause of a wobbly fan is something you can fix in five minutes with a damp cloth: dust. A surprising amount of grime can build up on the tops of fan blades, and it almost never collects evenly. This tiny weight difference is often all it takes to throw the whole unit off balance.
Before you touch anything, turn the fan off at the switch and wait for it to stop completely. Get your stepladder and a damp microfibre cloth, then carefully wipe down the top and bottom of each blade until they’re spotless.
For many homeowners, this simple clean is the magic bullet. Turn the fan back on and see if the wobble is gone. If so, you’ve just saved yourself a lot of hassle. If not, don’t worry—it’s time to move on to the next check.
If a good clean didn’t do the trick, the next logical suspect is loose connections. The constant rotation and vibration of a fan can work screws loose over the years. Your job is to find and tighten them.
You’ll want to check for loose screws in three main spots:
A professional tip is to work your way around the fan methodically. Start with blade number one, check all its screws, then move to two, and so on. This ensures you don’t miss a single one. Once everything is tight, turn the fan on again to check for improvement.
Still shaking? A bent blade bracket or a warped blade might be the problem. This is where a simple tape measure becomes your best diagnostic tool.
Pick a fixed point on the ceiling as a reference, like the corner of the room. Rotate one fan blade by hand so its tip is aligned with your reference point. Now, use your tape measure to check the distance from the tip of the blade down to the floor (or up to the ceiling—just be consistent).
Write that number down. Then, carefully rotate the next blade to the exact same spot and measure it. Do this for all the blades. If one is significantly higher or lower than the others—a difference of more than a centimetre often points to a problem—you’ve likely found a bent bracket that needs to be gently bent back into alignment or replaced.
If the blades are level and every screw is tight, the wobble is probably caused by a tiny, invisible weight difference in the blades themselves. This is where a fan balancing kit comes in handy. These cheap kits usually contain a plastic clip and a few small, self-adhesive weights.
The process is simply trial and error:
This systematic approach can fix almost any wobble. Here in Queensland, imbalanced blades and loose connections account for 22% of residential electrical service calls, a figure that has climbed since the post-2020 renovation boom. A simple repair, which typically costs between $120 and $250, is far more economical than major wiring jobs and can boost your fan’s efficiency by up to 30%, saving you money on energy bills. You can learn more about Australian ceiling fan market trends on Grand View Research.
That awful click-click-click, hum, or grinding noise from your ceiling fan isn’t just annoying—it’s a warning sign. While a quiet, low hum from the motor is perfectly normal, any other mechanical sound means it’s time to play detective.
The good news is that tracking down the source of the noise is usually straightforward. Most unwanted fan noises fall into three camps: rhythmic clicks, a metallic scrape, or an electrical buzz. Each sound points to a different culprit, but almost all of them can be sorted out with a few simple checks. Before you assume the worst, remember that the problem is often something minor, like a loose screw.
A rhythmic click or rattle that matches the fan’s rotation is almost always a physical issue—something is loose or making contact where it shouldn’t. This is one of the most common problems we encounter, and thankfully, it’s usually an easy fix.
First things first: turn the power off at your circuit breaker. Once you’re safely up on a ladder, start by gently wiggling different parts of the fan assembly.
I’ve lost count of how many “noisy fan” callouts turned out to be a single loose screw on a light shade. It’s a five-second fix that can save you a lot of hassle, so always start with the simplest checks first.
A metallic grinding or scraping is a more serious sound. It often means there’s an issue with the fan’s internal moving parts, usually pointing to worn-out motor bearings. On older fans, these bearings can fail after years of spinning away.
Most modern ceiling fans have sealed motors where the bearings are lubricated for life and can’t be serviced. However, if you have an older model with small holes labelled “oil,” you might be in luck. Adding a few drops of specialised, non-detergent electric motor oil could solve the problem. Never use WD-40 or other household lubricants, as they will gunk up the motor’s internals and cause more damage.
If your fan doesn’t have oil ports and is grinding away, it’s a strong sign the motor bearings are gone. At this stage, you need to weigh your options. Replacing the motor itself is often as expensive and complicated as replacing the entire unit, making a new fan the more practical choice.
A constant, low-frequency electrical hum is a different beast entirely. This sound usually comes from the motor and is often caused by an incompatible wall controller. Standard light dimmer switches are not designed to control a fan’s speed. They work by “chopping” the electrical sine wave, which forces the motor to buzz loudly and can damage it over time.
The only correct fix is to replace the dimmer with a fan-rated speed controller. These are specifically built to regulate motor speed properly without causing that irritating hum. While it’s a straightforward job, it involves mains wiring. To ensure it’s done safely and complies with Australian standards, this is a task best left to a licensed electrician.
If your fan hums even without a dimmer switch installed, the issue could be inside the motor itself, which may be a sign it’s nearing the end of its life.
When your ceiling fan just gives up—no lights, no spin, absolutely nothing—it almost always points to an issue with the power supply. It can feel a bit daunting, but the fix is often surprisingly simple and doesn’t mean you need to replace the whole unit.
Whether it’s a dodgy pull chain or a remote that’s decided to stop talking to the fan, a step-by-step approach will get you to the root of the problem.
But first, safety. Before you touch anything, turn off the power at your circuit breaker. Then, use a voltage tester on the fan’s wiring to double-check that the circuit is dead. Your safety is always the number one priority.
In our experience, two of the most common parts to fail are the pull chain and the reverse switch. These are mechanical components that get used constantly, and they simply wear out.
A broken pull chain switch is usually easy to diagnose. If you pull the chain and feel no tension or don’t hear that familiar “click,” the mechanism inside has likely failed. Replacing this is a straightforward job; you just need to wire in a new one, which you can pick up from any major hardware store.
The reverse switch, which changes the blade direction for summer and winter, can also be a culprit. If your fan works in one direction but not the other (or not at all), try flicking the switch back and forth a few times. Sometimes a bit of dust is the only problem, but if that doesn’t work, the switch itself probably needs replacing.
If the switches seem okay, the next place to check is inside the fan’s switch housing. With the power confirmed off, carefully remove the light kit and the housing cover to get a look at the wiring. You’re looking for anything that seems loose or out of place.
Pro Tip: Before you touch a single wire, snap a quick photo on your phone. It’s the easiest way to create a wiring map so you don’t have any headaches when putting it all back together.
Gently tug on each of the plastic wire nuts. Is everything tight? A loose wire is a classic reason for a fan or light to work intermittently or just stop altogether. If you find one, unscrew the nut, twist the wires together firmly, and pop a new wire nut on to secure it.
Sometimes, strange noises can also hint at an electrical problem, like a humming sound caused by an incompatible dimmer switch. This chart can help you figure out what your fan is trying to tell you.
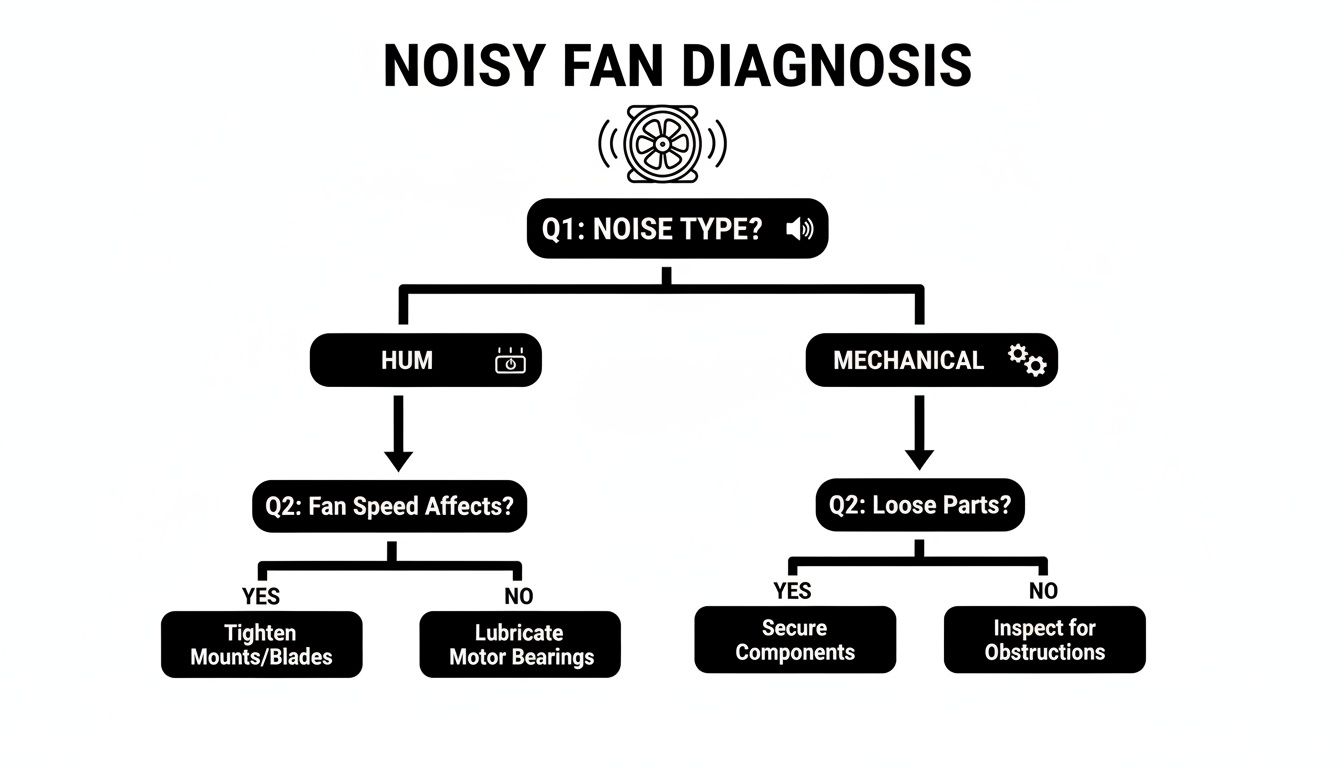
As the guide shows, a humming noise is often electrical, whereas clicks and scrapes usually point to a mechanical issue like an unbalanced blade.
For remote-controlled fans, the process is a little different. If the remote isn’t getting any response, always start with the simplest fix first.
This handy table can help you decide whether to tackle the job yourself or bring in the professionals.
Use this guide to determine which ceiling fan problems are safe to tackle yourself and when you absolutely need a licensed electrician.
| The Problem | A Safe DIY Approach | Call a Pro Electrician When… |
|---|---|---|
| Wobbly Fan | Tighten all blade and motor housing screws. Use a balancing kit. | The wobble is severe or persists after balancing, suggesting a bent motor shaft or mounting issue. |
| Noisy Operation (Clicks, Scrapes) | Check for loose screws, cracked blades, or anything obstructing the blades. | The noise is a loud electrical hum or grinding sound coming from the motor itself. |
| No Power (Fan & Lights Dead) | Check the circuit breaker and wall switch. Test the pull chain and reverse switch. | You suspect faulty house wiring, see scorch marks, or you’re not 100% confident working with wiring. |
| Remote Control Not Working | Replace batteries. Re-pair the remote by matching DIP switches or using the “learn” button. | The receiver in the canopy needs replacement, or you suspect a deeper electrical fault. |
| Light Kit Not Working | Change the light bulbs. Check the pull chain and inspect the wire connections inside the housing. | The light socket or internal wiring is damaged, or the problem lies with the home’s main wiring. |
Ultimately, if you ever feel unsure or see signs of burning or melted wires, it’s not worth the risk. A quick call to a professional electrician like DLG Electrical is the safest bet.
In a climate like Queensland’s, a good ceiling fan is non-negotiable. It’s no surprise the Australian ceiling fan market is valued at USD 224 million in 2024. We see firsthand that improper installations cause around 30% of fan failures, which is exactly why regulations require a licensed sparkie for the job. For Brisbane homeowners, a repair costing $100-$250 is a smart move, often saving up to 60% compared to a full replacement.
Before you start troubleshooting any noise, a simple clean can work wonders. Learning how to clean ceiling fans is often the first step to getting things running quietly again. And if you’re thinking about an upgrade, you can read also our comparison of DC vs AC ceiling fans to help you choose the right model for your home.
There’s a real satisfaction that comes from fixing something yourself, we get it. But the smartest person on any job site is the one who knows their limits, especially when electricity is involved. While you can sort out a wobbly or noisy fan with a few basic tools, some red flags are absolute showstoppers.
Ignoring these signs isn’t just about risking your fan—it’s about risking your home and your safety. Think of this as your final, most important safety check. If you’ve run through all the troubleshooting steps and the fan is still misbehaving, or you spot any of the serious warning signs below, it’s time to put the tools down and call a licenced professional.
Some problems are far bigger than a DIY fix. These are the situations where you need to immediately turn off the power at your switchboard and contact a qualified electrician. No exceptions.
Any of these symptoms point to a critical failure. Trying to fix ceiling fan issues of this magnitude without the proper training and diagnostic gear is incredibly dangerous.
It’s vital to know that in Queensland, the law is crystal clear: any electrical work that involves hardwiring must be performed by a licenced electrician. This isn’t a friendly suggestion; it’s a legal requirement put in place to protect you.
This includes common tasks like:
Attempting this kind of work yourself doesn’t just put you at risk of a nasty electric shock—it can also void your home insurance policy. If an electrical fire ever occurred because of non-compliant DIY work, your insurer would almost certainly deny the claim. For a detailed guide on what to expect, you can learn more about finding a professional Brisbane electrician.
For over 19 years, DLG Electrical has been the team homeowners across Brisbane, Grange, and the entire Northside have relied on. We know that when you need an electrician, you want someone reliable, honest, and absolutely committed to safety. Our fully licenced and insured team has seen it all, from simple remote receiver swaps to tracking down complex wiring faults.
When you call us, you’re not just getting a quick fix. You’re getting the peace of mind that comes from knowing the job is done right the first time and is fully compliant with all Australian standards. For a professional, safe, and guaranteed solution to your ceiling fan problems, trust the local experts at DLG Electrical.
When it comes to fixing a ceiling fan, a few questions pop up time and time again. As Brisbane electricians, we’ve heard them all. Here are the answers to the queries we get most often from homeowners just like you.
The final price really depends on what’s gone wrong. For a simple fix, like balancing a wobbly fan or tightening up some loose fittings, you’re likely looking at a cost between $100 and $180. It’s usually a quick job for an experienced electrician.
If the problem is more serious—think a burnt-out motor, a fried remote receiver, or a dead capacitor—the repair will be more involved. In these cases, you can expect the cost to be somewhere in the $150 to $300 range. This is almost always a better deal than a full replacement, which can easily set you back $250 to $500+ once you buy a new fan and pay for installation.
We get this one a lot, and the answer is a firm no. In Queensland, it’s illegal for anyone other than a licensed electrician to perform work that connects to your home’s fixed wiring. Installing a ceiling fan falls directly into this category.
It’s not just red tape; this law exists to protect you, your family, and your property. DIY electrical work can void your home insurance and, far more importantly, create a serious risk of fire or electric shock. It’s just not worth it.
While many minor ceiling fan issues can be tackled with a bit of DIY confidence, it’s vital to know your limits. Just like knowing when to call a professional for specialised home services, recognising that a job involves fixed wiring or complex faults is your cue to engage a qualified Brisbane Electrician.
This is a classic head-scratcher. If your remote works perfectly but the wall switch does nothing, the fault almost certainly lies with the switch or its wiring.
We often find it’s a simple loose connection behind the faceplate. Other times, the switch mechanism itself has just worn out from years of use. Even though the remote talks to the fan’s receiver just fine, a dead wall switch is an electrical fault. For safety and to meet legal standards, this is a job for a professional electrician to diagnose and repair.
If you’re dealing with a fan problem you can’t solve or you’d just rather have the peace of mind that comes with a professional job, DLG Electrical is here to help. Contact us today for a free quote, and our experienced Brisbane team will get your fan running smoothly and safely.

Master Electrician with over 30 years of experience. Founded DLG Electrical in 2005 after international project work including electrical installations at Stamford Bridge Stadium, London(Home of Chelsea FC).

Local Electricians that can fix all Electric Hot water Systems.
Motion sensor lights are a versatile addition to any home, offering nu
