83 Jean St, Grange QLD 4051
Mon-Fri 07:30 AM - 04:00 PM - Sat - 8:00 - 12 - Sunday Closed

You've got the kitchen half stripped, the electrician is standing under the ceiling with a tape measure, and the cabinetmaker is asking where the island pendants will land. That's the moment an electrical wiring layout stops being a drawing and becomes the thing that decides whether the reno runs cleanly or turns into a patch-up job later. In Brisbane, that decision has to line up with the AS/NZS 3000 Wiring Rules, Queensland smoke alarm rules, and the reality of longer cable runs, tighter switchboards, and future electrification.
In a Brisbane reno, the electrical wiring layout is the part of the job that gets decided while the walls are open, not after the plasterer has packed up. It's the marked-up plan that shows where circuits go, where points land, how the switchboard is split up, and how the cable paths will work once the house is back together.
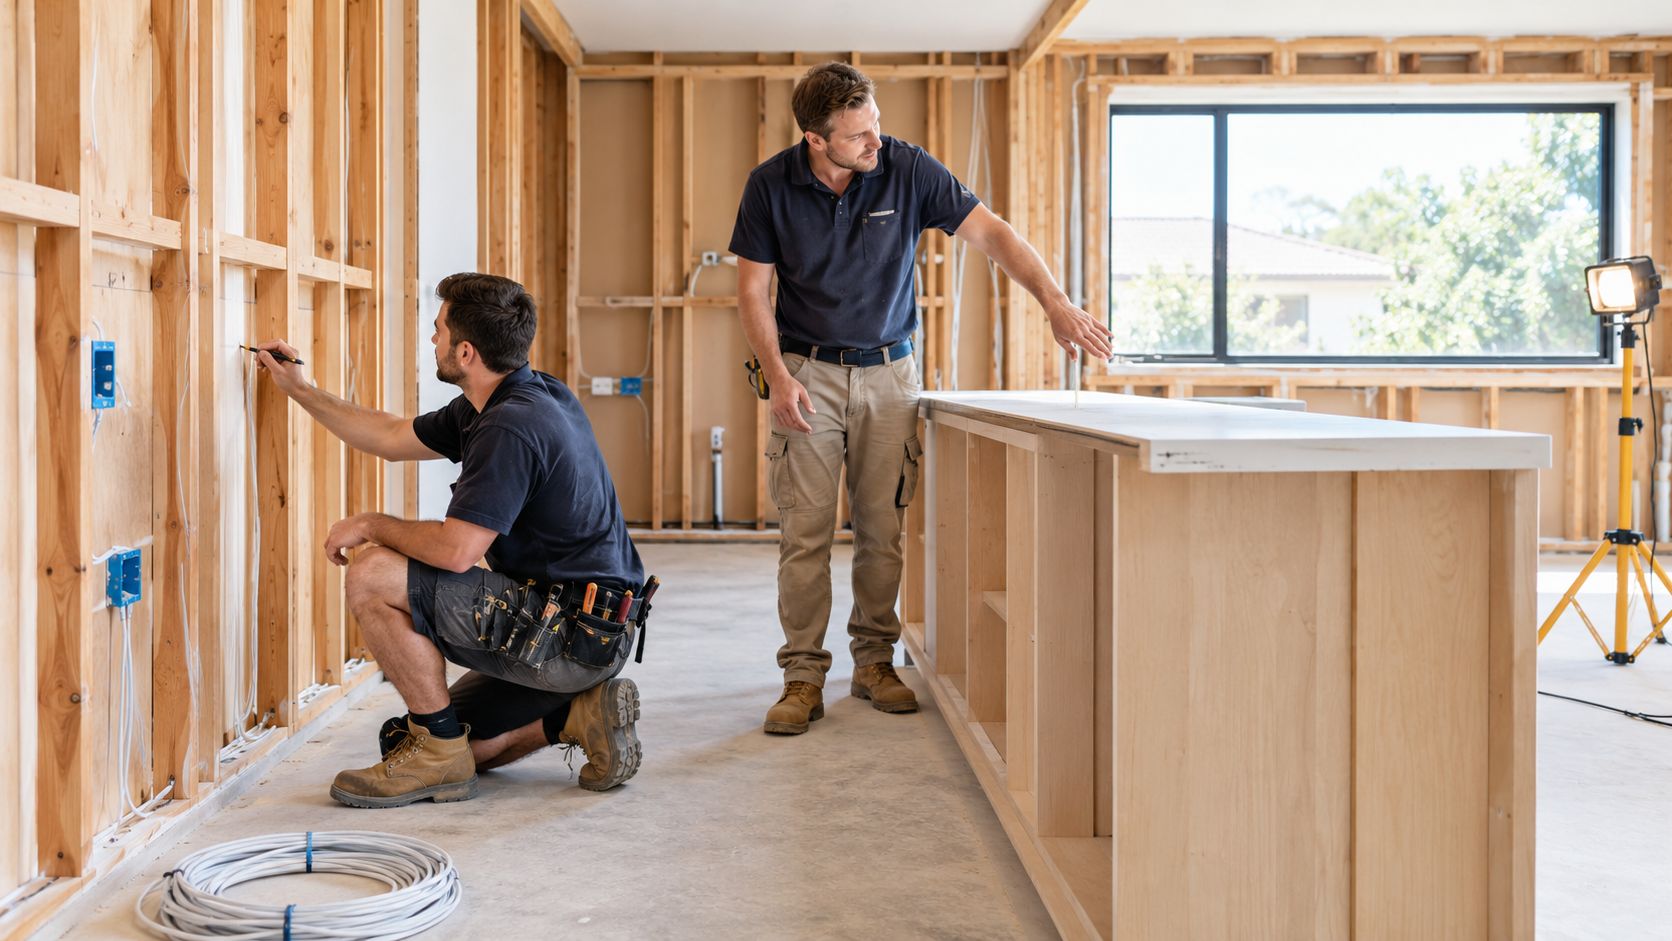
A good layout is broader than most homeowners expect. It covers circuit groupings, cable routes, switchboard way allocations, point locations, and the load schedule that tells the sparkie whether the house can carry what you want to add. It does not decide appliance brand, data package, or security gear selection, although those choices can still affect the way the wiring is planned.
A layout drawing shows where things sit in the house. A wiring diagram shows how components connect electrically. A single-line schematic gives the high-level structure of the installation, usually from supply to board to final circuits.
Most homeowners only ever see the layout, and that's fine. That's the one that matters when the kitchen framing is open and the electrician is trying to avoid a pendant light sitting exactly where a range hood duct needs to go.
Practical rule: once plasterboard goes up, layout mistakes become expensive, because the cleanest cable path is usually the one you should have decided on first.
The important mindset shift is simple. The wiring layout is not a shopping list you can change room by room later. It's a one-shot coordination task that locks in switchboard size, RCD count, and where cables can physically travel without creating a mess or a compliance problem.
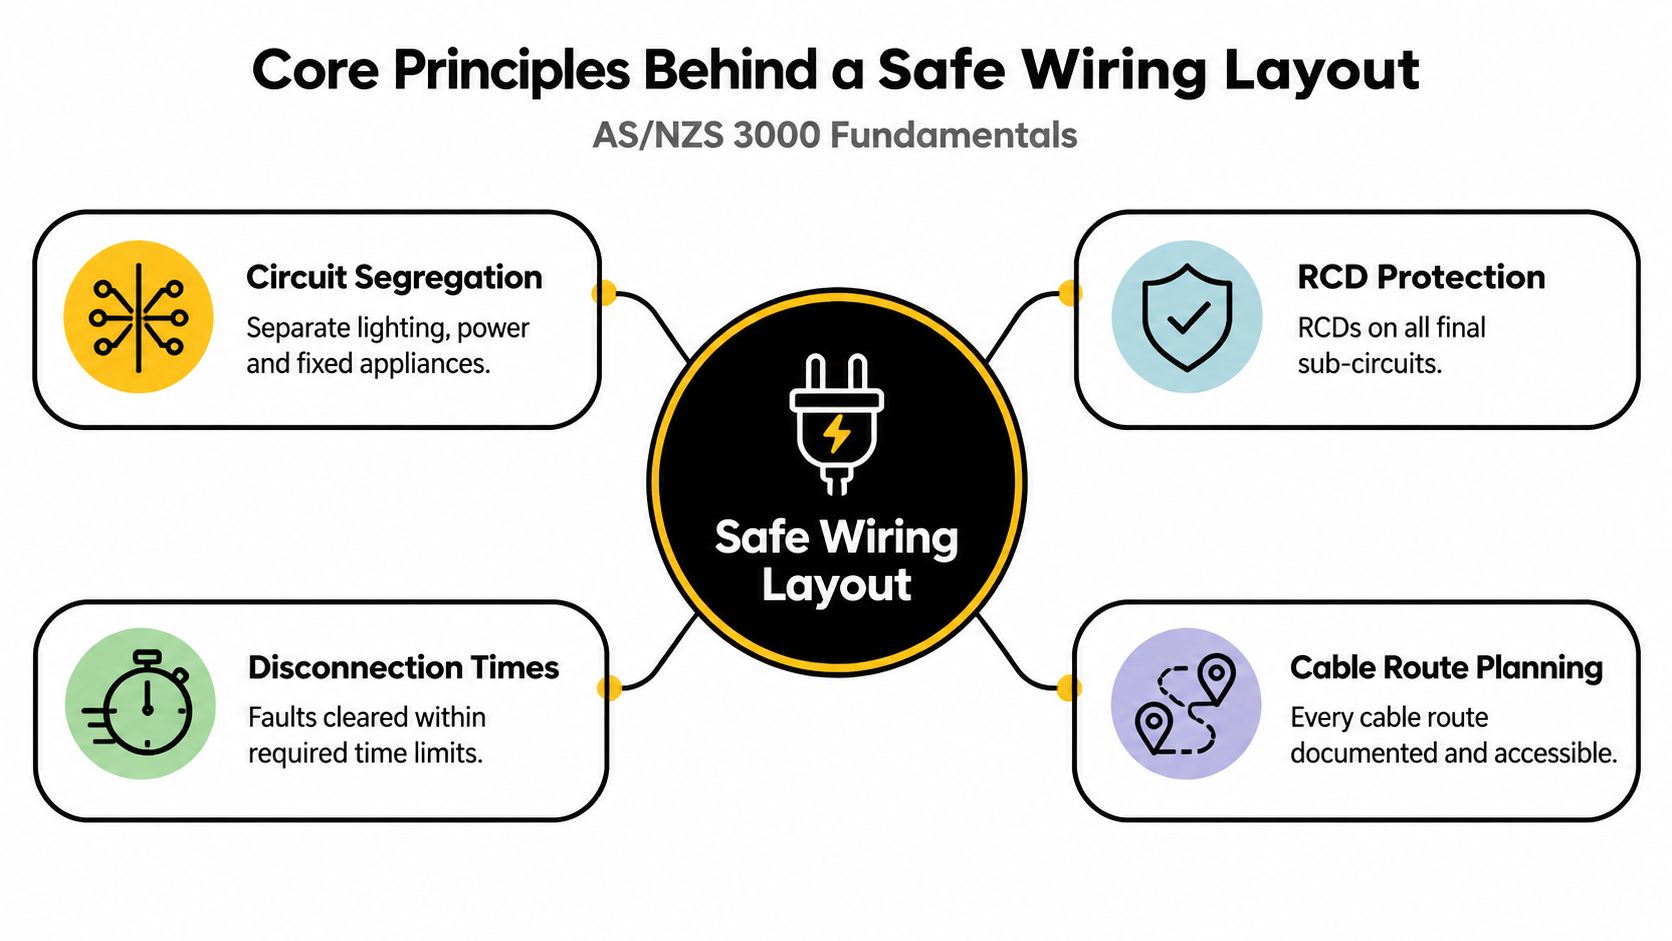
The Wiring Rules are not there to make a sparky's life awkward. They're there because the layout itself affects safety, fault isolation, voltage delivery, and how much of the house goes dark when something fails. Under AS/NZS 3000:2018, the design, construction, and verification stages are treated as one compliance chain, so a bad routing choice can still matter even if every part on the shelf is perfectly rated.
Lighting, power, and fixed appliances shouldn't all be crammed through the same thinking. If one circuit trips, you want the fault contained, not the whole place dropped into darkness while the fridge, TV, and lights all disappear together.
That's why layout planning starts with segregation. A neat board is useful, but a practical board is better, because it keeps faults local and makes testing easier during the handover.
The 2018 Wiring Rules introduced mandatory RCD protection for all domestic and residential final sub-circuits in Australia, and that changes layout decisions from the start Standards Australia electrical standards overview. In plain terms, you're not just drawing cable routes, you're deciding how the whole house will be protected at the board.
A cable run hidden in insulation, buried behind framing, or squeezed through a bad path isn't just awkward. It can affect heat dissipation, access, and verification, which is why route planning needs to be done before the cavity is closed. The job is easier when every route is deliberate instead of improvised.
Voltage drop is part of layout design, not an afterthought. Australian/New Zealand rules limit total voltage drop to 5% from point of supply to point of utilisation, which is about 11.5 V on a 230 V single-phase circuit and about 20 V on a 400 V three-phase circuit Metroid voltage drop guidance. Long cable runs can make lights look dull and motors work harder, so layout and conductor size need to be planned together.
A Brisbane renovation can look straightforward until the owner lists the actual loads: split-system air-conditioning, an induction cooktop, an oven, electric hot water, pool equipment, and a future EV charger. Each one affects cable routes, circuit separation, switchboard capacity, and the spare ways left for later work.
Circuit planning should reflect normal use rather than assume every appliance draws full power at the same moment. Diversity allows the electrician to assess the likely maximum demand across the installation, while still giving larger or continuous loads the dedicated protection and cabling they require.
A worked example shows the principle:
These figures are illustrative only. A licensed electrician must confirm maximum demand and circuit design under AS/NZS 3000, using the appliance ratings, installation conditions, supply capacity, and the way the home will be used. Oven, hot water, pool equipment, and future EV charging also need to be assessed rather than assigned guessed allowances.
The diversified figure does not mean the appliance has become smaller or needs a smaller cable. It helps assess how simultaneous use affects the installation. Conductor selection still depends on current, installation method, protection, route length, heat, and the insulation and ampacity of 14 AWG described in Bulls Eye Repair's guide to 14 AWG amp rating. Australian cable sizes and installation rules differ, so that guide is only a general comparison.
A four-bedroom Brisbane home with two split systems, an induction cooktop, and a 32A EV provision will often push the design toward six to eight dedicated circuits, alongside the lighting and general-power circuits. The final count depends on the equipment and supply, but the example explains why a bare-minimum layout becomes restrictive quickly.
Long runs add another decision. A detached garage, rear outdoor unit, or distant switchboard may need a larger conductor to manage voltage drop, even when the protective device rating appears adequate. Routing that cable early is usually easier than replacing it after walls, ceilings, or paving are finished.
Reserve capacity for electrification during the renovation. Leaving spare switchboard ways and a practical path for future circuits costs less than reopening finished work when the owner later adds charging, induction cooking, or another high-load appliance.
A good switchboard is easy to reach, easy to label, and easy to expand. In a typical post-war Brisbane home, that usually means a garage wall or an external wall cavity with clear access, not a cramped corner that needs furniture moved every time a breaker trips.
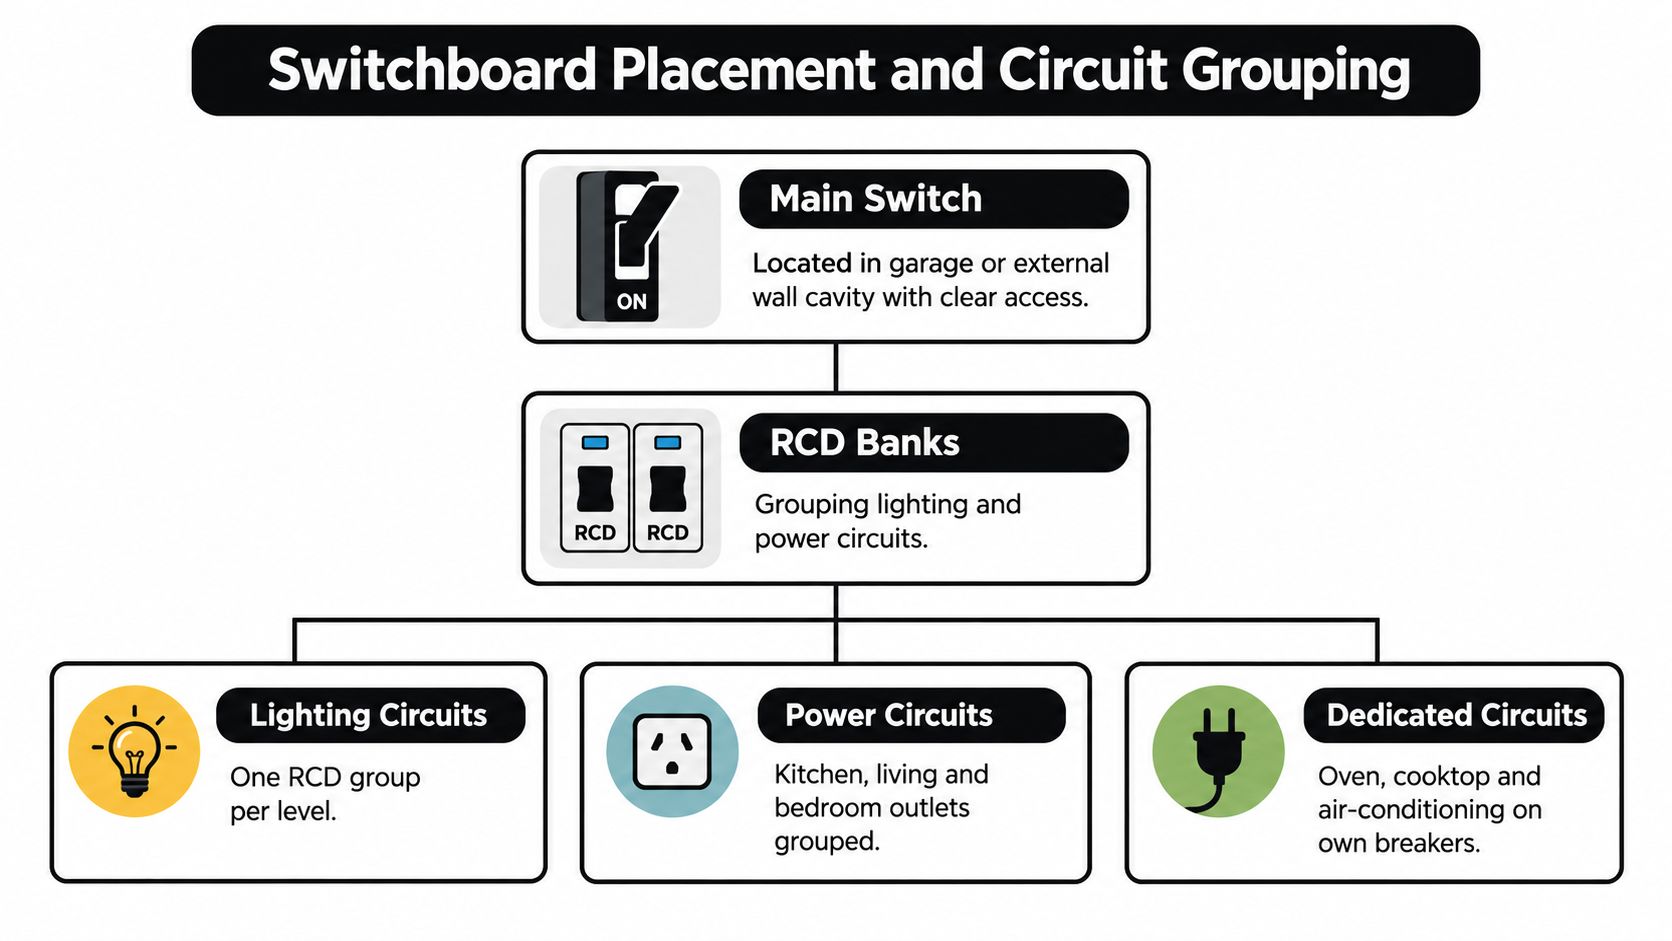
Think of the board as grouped by function. Lighting circuits sit together, power circuits sit together, and dedicated appliances get their own breakers. That way, a fault in one area doesn't wipe out everything else.
The internal structure matters too. The old habit of overpacking a small enclosure is a false economy, because a board with no spare ways becomes awkward the moment you add solar, battery provision, induction cooking, or an EV circuit. A 12-way enclosure can work on a simple job, but a 20-way enclosure gives you far more breathing room when the house is being upgraded in stages.
If a fridge circuit and a lighting circuit share the wrong path, nuisance tripping becomes a pain fast. If the kitchen oven, hot water, and air-conditioning are all squeezed into the same congested area, fault finding gets slower and future work gets messier.
Practical rule: lighting on one RCD group and power on another is easier to live with than a board where one nuisance trip blacks out half the house.
The board also has to be labelled properly, with clearances maintained around it and consumer mains sized to suit the installation. For a useful Queensland-specific overview of upgrade triggers and board considerations, the DLG Electrical guide on switchboard upgrade regulations is a practical reference point.
{{}}
A decent layout comes alive when you stop talking about the whole house and start drawing the rooms. Kitchens, bathrooms, and living spaces all behave differently, and the wiring should reflect that difference instead of forcing a one-size-fits-all answer.
The kitchen usually needs the most disciplined layout in the house. Two dedicated appliance circuits is a common sensible starting point, with a separate general power circuit for benchtop outlets, plus a switched exhaust on its own run and pendant provisions centred to the island or bench zone.
GPOs should sit away from the sink edge, because messy appliance placement and splash zones don't forgive sloppy planning. If the oven, cooktop, and dishwasher are all being reworked in a renovation, the framing stage is the time to pin down where the fixed loads will live, not after cabinets are already set.
Living rooms and bedrooms benefit from layered control. A few lighting groups let you light the room for general use, task use, or evening use without overcomplicating the wall switches.
TV and media walls are a good place to think ahead too. Cable concealment for the TV, the modem, and the data point should be planned with the cabinet layout, not improvised once the plaster is finished. If you're aiming for a clean finish, that's where the electrician and carpenter need to be talking to each other early.
Bathrooms are less forgiving because wet-zone design has to be right first time. A properly planned bathroom circuit needs the right RCD protection, appropriate fittings for the zone, and ventilation timed sensibly with the light so moisture doesn't just hang there after a shower.
The best bathroom layouts keep the electrical work simple enough to verify, but specific enough to suit the room's function. In a renovation, that usually means accepting that some cable routes are easier than others, and choosing the one that avoids ugly patching later.
Queensland smoke alarms change the wiring conversation because they affect the ceiling plan, not just the device choice. In this state, alarms must be photoelectric, interconnected, and hardwired by a licensed electrician, with battery backup required, so a retrofit can turn into a ceiling coordination job rather than a simple swap Queensland smoke alarm FAQ.
The alarm network needs cable runs that land in the right places before the ceiling gets closed. That means junction locations, interconnection paths, and the number of pulls all need to be considered while the ceilings are open, especially in an older Queenslander where VJ ceilings and tight roof spaces make rewiring more fiddly than in a newer two-storey build.
A house plan that looks neat on paper can still be awkward if the smoke alarm positions don't line up with the framing and ceiling access. That's why choosing the building layout with compliance in mind matters from the beginning, and why a plan review against code is worth doing before work starts. A useful external reference on that broader planning mindset is RBA Home Plans' guide to choosing a house plan within code.
| Requirement | Standard | Layout Impact |
|---|---|---|
| Photoelectric alarms | Queensland rule set | Device type must be chosen before ceiling rough-in |
| Hardwired interconnection | Queensland rule set | Extra cable paths and junction points need planning |
| Licensed electrician installation | Queensland rule set | Homeowners can't treat alarm wiring as a DIY shortcut |
| Placement in bedrooms, hallways, and on each storey | Queensland rule set | Ceiling runs must reach the right zones before plaster |
| Wet-area awareness | AS/NZS 3000 and Queensland practice | Bathrooms, laundries, and outdoor areas need careful routing and protection |
The simplest mistake is trying to retrofit alarms after the rest of the renovation is finished. That usually means opening ceilings twice, which is exactly the kind of extra cost and disruption that good layout work is supposed to avoid.
For a broader compliance overview, the DLG Electrical article on smoke alarm compliance in Australia is a practical next read.
A layout that only just meets today's needs can become a nuisance as soon as the house starts moving toward all-electric living. Brisbane homes are seeing more demand from EV charging, induction cooking, and solar or battery additions, and that changes what a sensible wiring layout should leave behind in the walls.
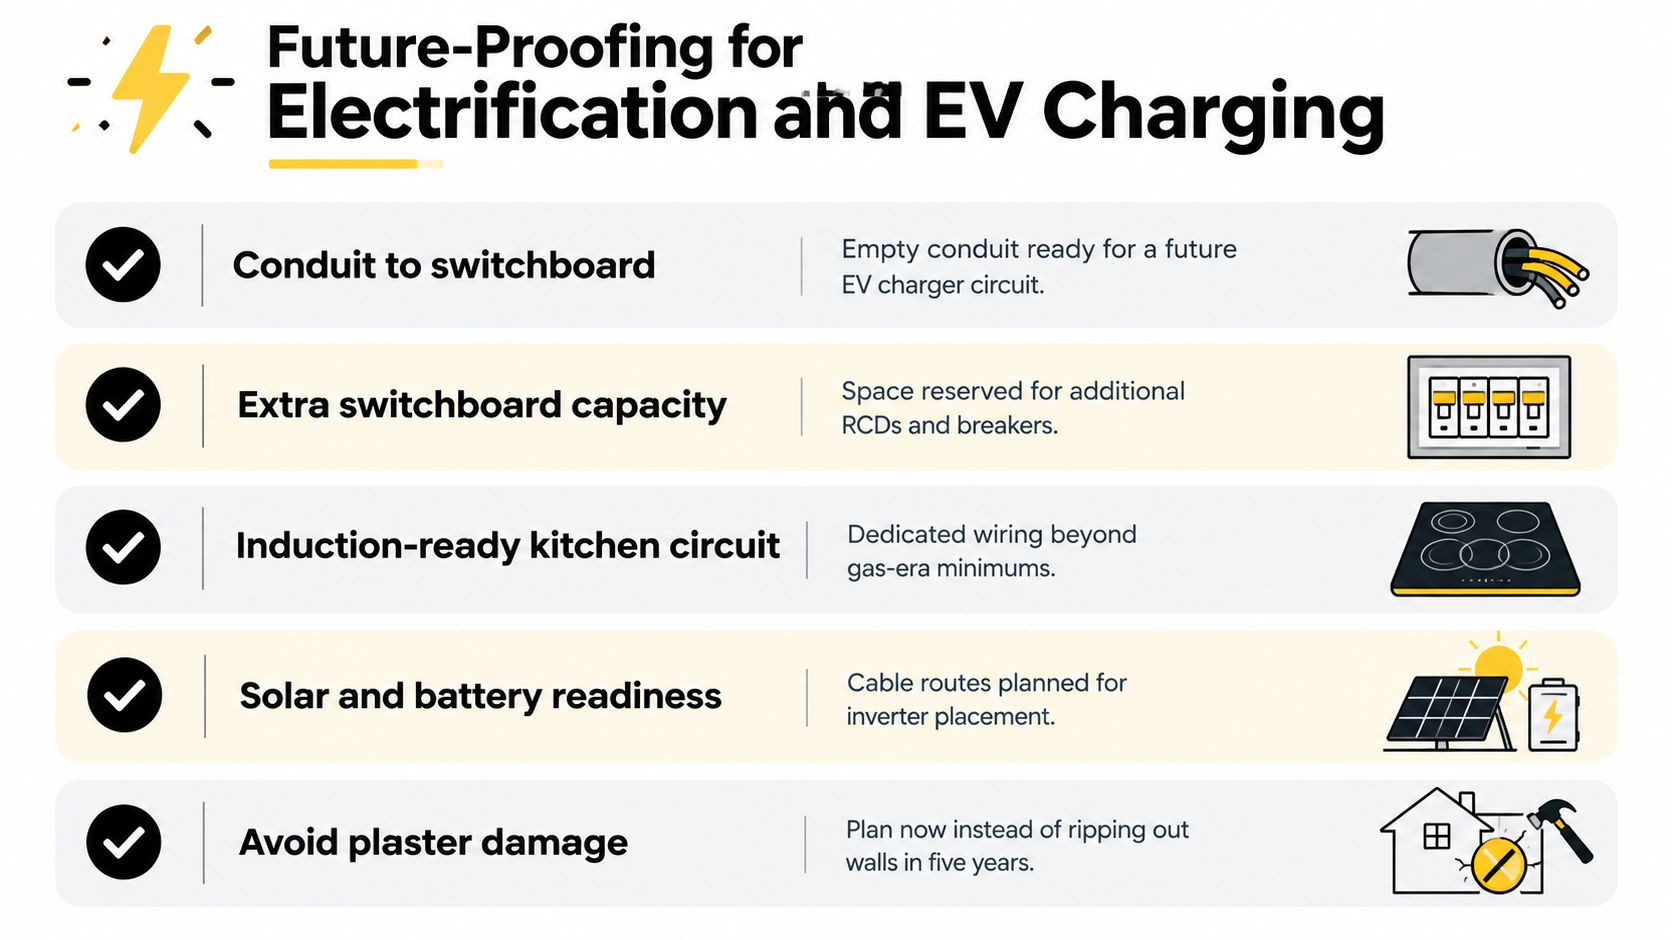
A garage or carport run for a future EV charger is the classic example. If you leave conduit, space in the switchboard, and a sensible cable path while the walls are open, you avoid tearing out plaster later when charging is no longer optional.
The same thinking applies to the kitchen. If gas is staying for now but induction is likely later, pulling a proper dedicated circuit to the cooktop position now can save a second round of patching and rewiring down the track. Solar and battery work also benefit from clear routing and spare space around the board and inverter positions.
A layout that only fits the current appliance list can be a false economy. If the cabling, enclosure size, or board capacity is too tight, the later upgrade usually costs more because the hard parts are hidden behind finished surfaces.
Spend the extra effort while the house is open. Cable, conduit, and board space are cheap compared with opening finished walls again.
For larger charging loads and load-management thinking, the operational side of EV infrastructure is worth studying too. The Solana EV article on scaling EV charging at resorts shows how load management becomes part of the planning conversation once charging is no longer a single-point decision.
If you're looking at a charger install specifically, the DLG Electrical guide on electric vehicle wall chargers is relevant to the layout choices that need to happen before the final fit-off.
A good electrician doesn't just turn up with cable and a drill. They start with a site visit, check the existing service capacity, sketch the circuit routes, and confirm how the switchboard will be grouped before the rough-in begins. That's the difference between a job that looks tidy in the ceiling and a job that is easy to live with later.
The handover should include a Certificate of Testing and Compliance, and the work should be signed off under the relevant AS/NZS 3000 process. Energised electrical work is not homeowner DIY in Queensland, and the smart money goes to the person who can design, verify, and label the system properly the first time.
A useful quote meeting checklist is short and direct:
The small details matter. A careful sparky labels every circuit at the board, photographs the rough-in before plaster, and leaves a marked-up plan in the meter box. That kind of work is what keeps the next tradesperson from guessing, and it's usually what separates a smart layout from a cheap one.
If you're planning a Brisbane renovation, DLG Electrical can help with layout design, switchboard upgrades, smoke alarm compliance, and future-ready cabling that fits the way your home will be used. Visit DLG Electrical to organise a quote and get the wiring plan sorted before the walls are closed up.

Master Electrician with over 30 years of experience. Founded DLG Electrical in 2005 after international project work including electrical installations at Stamford Bridge Stadium, London(Home of Chelsea FC).

Local Electricians that can fix all Electric Hot water Systems.
Motion sensor lights are a versatile addition to any home, offering nu
